Hello everyone! In this article we'll walk through setting up automatic emailing of RouterOS .backup files on a predefined schedule.
This tool is extremely handy when hardware physically fails and you need a hot replacement. For large organizations with heavy network load and frequent changes to user access tables, back up more often — daily or even every 6 hours. It all depends on how often you change your RouterOS configuration. If the organization is small and the config rarely changes, a monthly procedure is enough.
Let's get started.
This setting lets RouterOS know when and how often to run the scheduled script. Go to /system SNTP client — one server is enough:
time.google.com142.250.110.18 if you don't have DNS configured (ip/dns)We'll set up sending using Yandex's SMTP server (Yandex Connect) as an example. Go to tools/email:
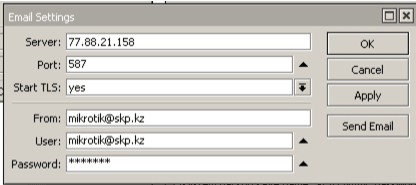
Make sure everything works by clicking "Send Email":
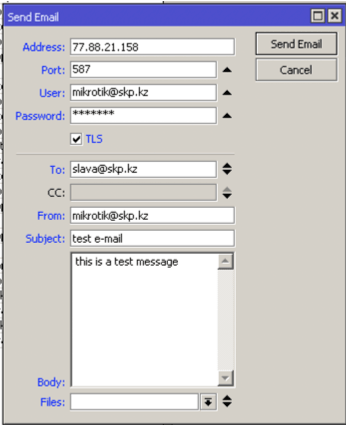
If the email arrives — continue. If not, you'll need to troubleshoot: one of the most common causes is ports blocked at the firewall level or a wrong mailbox password. Check the system logs for more details.
Go to system/scripts and create a script. You can copy this text, replacing the values with your own (email address, password, file name, etc.):
:local EMAIL "[email protected]"
:local PASSWORD "qwertq-1"
:local FILENAME "Netanya"
:local MESSAGE "Please see attached file..."
:local TIME ([/system clock get time])
:local DATE ([/system clock get date])

/system backup save name=$FILENAME password=$PASSWORD
/delay 30
/tool e-mail send file=$FILENAME to=$EMAIL subject="Your MikroTik backup file Netanya of $DATE $TIME" body=$MESSAGE start-tls=yes
/delay 30
/file remove $FILENAME
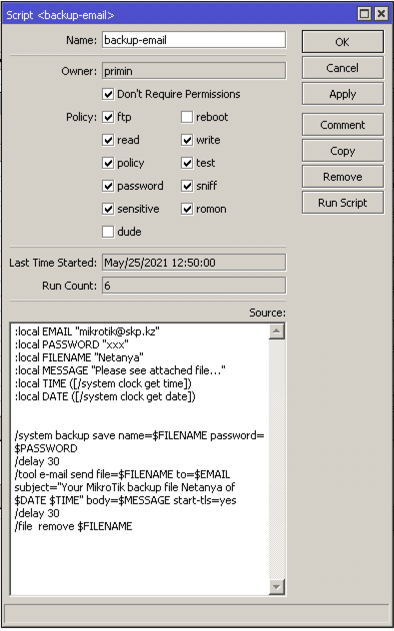
The script creates a .backup file with your settings, emails it, and then deletes the file from RouterOS storage to save disk space (on home routers it's very limited).
Check that everything works by clicking "Run Script". You can monitor execution via the "Files" panel (you'll see the .backup file created and removed) and via the Log window (you'll see the email-sent event).
One last step. Go to System/Scheduler and set the frequency:
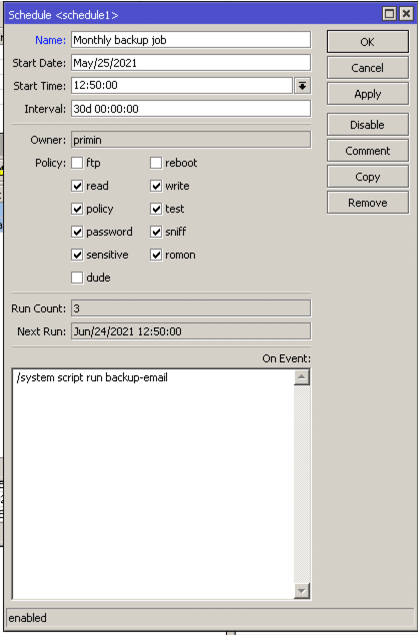
Only two parameters really matter: the send frequency (30 days in this example) and the script to run, at the bottom of the window:
/system script run backup-email
Where backup-email is the name of the script we created earlier. That's it — setup complete.
P.S. Periodically check your backup mailbox to make sure emails are arriving — any automation is prone to occasional failures. For convenience, set up incoming-mail filtering and folder sorting using your mail service.
I wish you to use the restore procedure as rarely as possible. I hope this article was helpful. Bye!
← Back to all articlesFree consultation and same-day cost estimate
Message on WhatsAppYour request has been received, we'll be in touch shortly.